How to create an option field customers can fill in freely in a Shopify theme

This article is an introductory book by our company on Shopify, Hello Shopify Themes: A Guide to Shopify Theme Development Here's an excerpt from .
Requests to receive additional information from users at the time of order can be found in many stores, such as the hope for gift wrapping, the wording on a product or the date and time of delivery.
It can be supported using an app, but if it is a little custom information input field, you can implement enough with just Liquid editing.
In this section, we will add an input element of "engraved word" on the product page and a check box of "Gift Wrapping Hope" to the cart page using a mechanism called "Line Item Property" and "Cart attributes".
what someone learns in this section
- Overview and usage of Line Item Property
- Overview and usage of Cart attributes
- Leveraging Shopify UI Elements Generator
- Design of Purchasing Form in Dawn
- implementation of test order
what someone makes in this section
- accept the "engraved word" on a product page
- Add a checkbox to your cart page for gift wrapping
The content of this article is also explained on YouTube.
Addition of Delivery Date and Time Designation
By using the Cart attributes introduced in this section, you can add an input element for the delivery date and time specified on your cart page.
However, in actual cases, we often use the app to specify the delivery date and time.
* If you do not use the app, it is difficult to adjust the delivery stop period (holidays and year-end and New Year holidays) in detail and cope with different designated time zones for each shipping company.
The typical shipping date and time designation app will be described later in Chapter 5.
Contents [ hidden display ]
Add an entry field to the product page in Line Item Property
Now, let's add the input element of an inscription word to a product page using Line Item Property.
Line Item Property
First, Line Item Property is an extension of information that can be sent from the cart addition form for a product.
Adding form widgets (form data input elements, such as input and select elements) to a product page in accordance with certain rules will allow you to obtain customized information like inscriptions and give additional data to Shopify when the item is purchased.
Information about Line Item Property sent to Shopify can be found on the Order Details page of the Administrative screen. You can also access it via an order completion email sent to a user or from your My Page's order information. Here is sample code for the Line Item Property input element: name attribute "properties[任意名称]" The form widget that is specified in the format of "Cart Add Form" and associated with an item will be a Line Item Property input element.
<input type="text" name="properties[任意名称]">Leveraging Shopify UI Elements Generator
Input and other input elements may be created by yourself, but this time we will use the "Shopify UI Elements Generator" provided by Shopify.
Shopify UI Elements Generator(Line Item Property)
https://ui-elements-generator.myshopify.com/pages/line-item-property
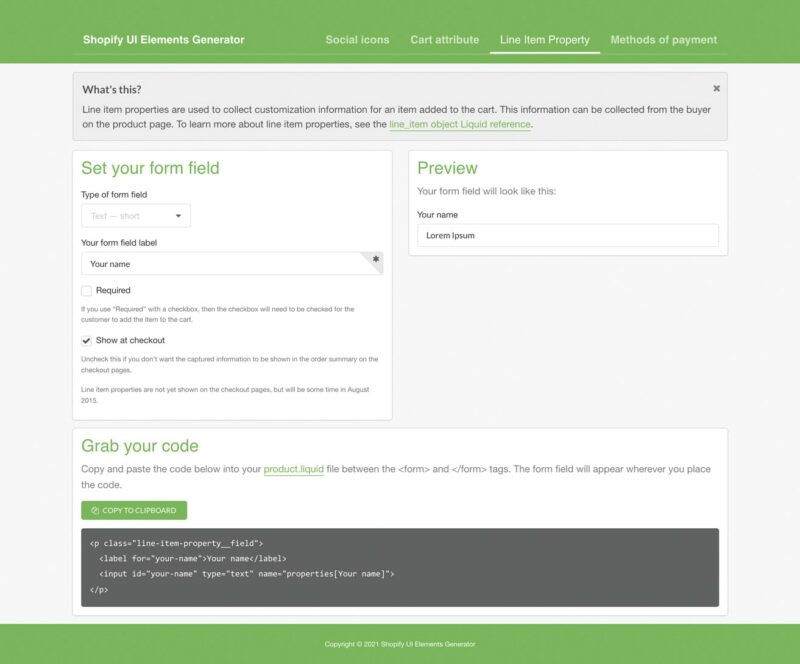
Shopify UI Elements Generator
The Shopify UI Elements Generator automatically generates HTML that is suitable for each form type (e. g. text, select box, radio button...) in a format similar to Line Item Property.
Here is the text input element of Line Item Property generated using a tool.
<p class="line-item-property__field">
  <label for="">刻印する文言</label>
  <input id="" type="text" name="properties[刻印する文言]">
</p>
Since the id attribute is generated in an empty field, please adjust it accordingly.
Embed this code into Dawn.
launch of a development theme
If you would like to actually edit with the development theme, please launch a local environment by the following command.
shopify theme dev
After executing the command, a URL to access the theme editor will also be displayed.
Describe input elements in Liquid
I want to add it in the Product Information section of my product page, so continue with the previous section. sections/main-product.liquid I'll edit it.
confirmation of edits
Where are the cart addition forms? With Dawn, {%- for block in section.blocks -%} in-loop {%- when 'buy_buttons' -%} be called by a block snippets/buy-button.liquid It's inside.
sections/main-product.liquid
{%- for block in section.blocks -%}
  {%- case block.type -%}
  //略
  {%- when 'buy_buttons' -%}
    {%- render 'buy-buttons', block: block, product: product, product_form_id: product_form_id, section_id: section.id, show_pickup_availability: true -%}
  //略
snippets/buy-button.liquid
<product-form
  class="product-form"
  data-hide-errors="{{ gift_card_recipient_feature_active }}"
  data-section-id="{{ section.id }}"
>
  //略
  {%- form 'product',
    product,
    id: product_form_id,
    class: 'form',
    novalidate: 'novalidate',
    data-type: 'add-to-cart-form'
  -%}
HTML Custom Elements
Unfamiliar HTML Elements <product-form> what? assets/product-form.js This is an autonomous custom element (not div or selection, but a uniquely defined HTML tag) that is defined in the "Web Components" section. I'm not going to explain it in this book, but if you want to learn more, check out Web Components and Custom Elements.
The form element in HTML is a Liquid tag {%- form 'product', …… -%} It has been rendered by.
You can add an input element to the Line Item Property you created earlier in this form, but here it is for loop processing. {%- when 'buy_buttons' -%} please note that it exists inside, as explained in the previous section {%- case block.type -%} 〜 {%- when 'ブロックのタイプ値' -%} The conditional branching is rendering Liquid according to the type of block added from the theme editor.
So here we are. {%- when 'buy_buttons' -%} If you write an input element on the form element inside, it does not separate from the buy_buttons block and is unable to change the display position freely.
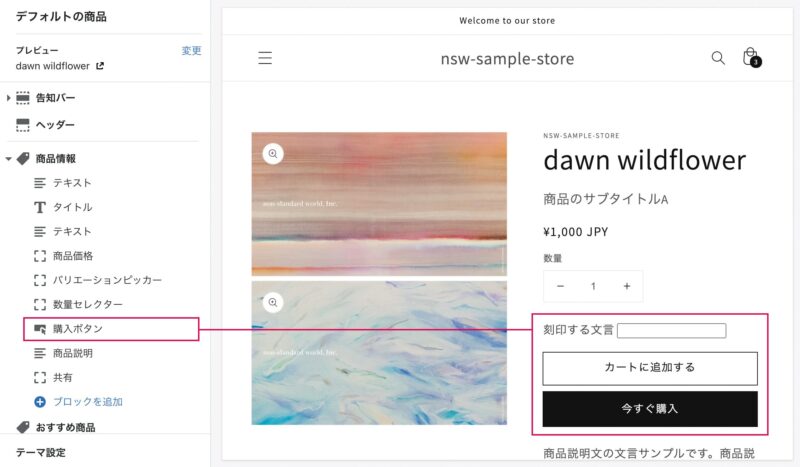 an image that is added within a form element)
In the Purchase Button block, add an input element to Line Item Property's engraving word.
For example, if you want to move only the input element of an engraving on a quantity selector block, it is impossible because it cannot be separated from the purchase button block.
So, in this section we will show you how to place the form input element outside of the form element.
Place the input element in Line Item Property outside of form
You might have noticed that “the quantity selector and variation picker are all outside the purchase button block.
In Dawn, we prioritize the sorting of each element or many form input elements are placed independently outside the form. The input element in the quantity selector is easy to understand. form="関連づけたいフォームのid値" By giving attributes, you can include the associated form in your submission target.
sections/main-product.liquid
// 数量セレクターのinput要素。form属性が指定されている
<input class="quantity__input"
  type="number"
  name="quantity"
  id="Quantity-{{ section.id }}"
  min="1"
  value="1"
  form="{{ product_form_id }}"
>
Following an already existing form input element to the input element of Line Item Property form="{{ product_form_id }}" Let's add an attribute.
And finally, sections/main-product.liquid The code to be added is as follows.
once {%- for block in section.blocks -%} Let's place it on the outside.
sections/main-product.liquid
{%- for block in section.blocks -%}
// 略
{%- endfor -%}

// ループの外に配置
<p class="line-item-property__field">
  <label for="engraveTxt">刻印する文言</label>
  <input id="engraveTxt" type="text" name="properties[刻印する文言]" form="{{ product_form_id }}">
</p>
When you open the product page in your local environment, you’ll see an additional engraved word input element: Type any text and add it to your cart – if you have a Cart Additional Notifications window and that product on your cart page, you will be successful!
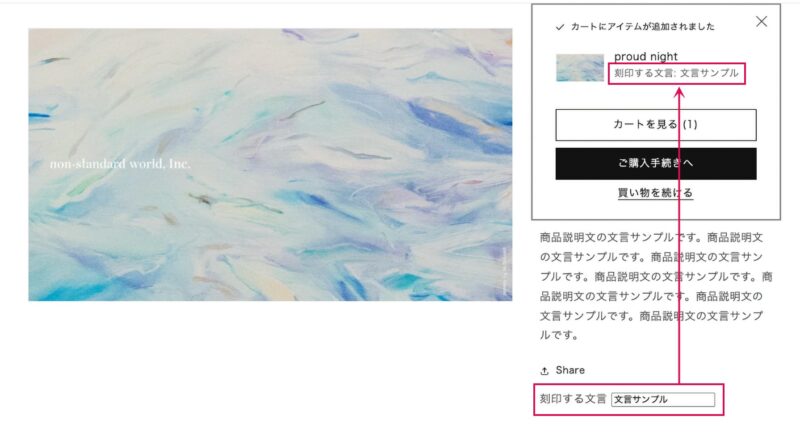 Successful delivery of metafield when adding cart
Display when you enter the inscription text and click "Add to cart" button.
The input element in the Line Item Property exists outside of the cart addition form, but is able to send a value without any problems
The current state is hard-coded in Liquid, so if you want it to be available from the theme editor as a block, please customize it by referring to "3-2.
Customize Shopify Dawn Themes - Create Dynamic Sections and Blocks
Supplement: If it doesn't work,
Some versions of Dawn have different form attributes, so they are sampled. form="{{ product_form_id }}" That might not work.
These form attributes need to match the id attribute of the form element they want to associate with. {%- form -%} Check what is being passed to the tag id.
sections/main-product.liquid
// 一例:Dawn 3.0.0における記述

// Liquid変数product_form_idの定義
{%- assign product_form_id = 'product-form-' | append: section.id -%}

// form要素外のinput要素。form属性に変数product_form_idが指定されている
<input class="quantity__input"
  type="number"
  name="quantity"
  id="Quantity-{{ section.id }}"
  min="1"
  value="1"
  form="{{ product_form_id }}"
>

// Liquidのformレンダリングタグ。id属性に変数product_form_idが指定されている
{%- form 'product', product, id: product_form_id, class: 'form', novalidate: 'novalidate', data-type: 'add-to-cart-form' -%}
Cart attributes add input fields to the cart page
We then use Cart attributes to add the checkboxes we want for gift wrapping on our cart page, but the basic flow is similar to Line Item Property.
On Cart properties
Cart attributes extend the information you can send from your cart’s purchase form, which is easy to see as a cart version of Line Item Property.
Cart attributes can also be added to carts with input elements that comply with certain rules so they get customized information and send additional data to the Shopify side when buying a product.
Information about Cart attributes sent to Shopify will be displayed on the Order Details page of the Admin screen, which can also be displayed in your order completion email to users or in your My Page order information.
name attribute. attributes[任意名称] Form widgets specified in the format and associated with cart purchase forms are Cart attributes input elements.
<input type="text" name="attributes[任意名称]">Leveraging Shopify UI Elements Generator
The "Shopify UI Elements Generator" described above can also be used to generate elements for Cart attributes.
Shopify UI Elements Generator(Cart attributes)
https://ui-elements-generator.myshopify.com/pages/cart-attribute
Elements generated by Line Item Property and Cart attributes are different, please use the appropriate generator.
Here is the code for this generated gift wrapping desired checkbox:
<p class="cart-attribute__field">
  <input type="hidden" name="attributes[無料ラッピング希望]" value="No">
  <input type="checkbox" name="attributes[無料ラッピング希望]" value="Yes"{% if cart.attributes["無料ラッピング希望"] == "Yes" %} checked{% endif %}>
  <label>無料ラッピング希望</label>
</p>
Now let’s embed the code into Dawn.
Describe input elements in Liquid
This code is added to the cart page.
In Dawn's cart page, the item detail part in the cart and the remark column · small sum · purchase button part are described in a separate section file, but I want to display this Gift Wrapping desired check box next to the remark field. sections/main-cart-footer.liquid Use the file.
In addition, since the remark column is hidden in the initial setting, let's check "Enable cart memo" from the setting of the theme editor "limited" section.
confirmation of edits
Notes on the cart page: {%- if section.settings.show_cart_note -%} It is in the tag.
sections/main-cart-footer.liquid
{%- if section.settings.show_cart_note -%}
  <cart-note class="cart__note field">
    <label for="Cart-note">{{ 'sections.cart.note' | t }}</label>
    <textarea class="text-area field__input" name="note" form="cart" id="Cart-note" placeholder="{{ 'sections.cart.note' | t }}">{{ cart.note }}</textarea>
  </cart-note>
{%- endif -%}
※ <cart-note> is a custom element of HTML. For custom elements, see Line Item Property's description part as a remark. <cart-note> Next to the element, add an earlier Cart attribute input element.
As with Line Item Attribute, you need to specify the form attribute in relation to placing an input element outside of a form.
commentary textarea if you look at the elements form="cart" The attribute is specified, and the Cart attribute input element follows this description. form="cart" The completed code is as follows: label elemental for the attributes, input 要素の id`` attribute has also been added.
{%- if section.settings.show_cart_note -%}
  <cart-note class="cart__note field">
    <label for="Cart-note">{{ 'sections.cart.note' | t }}</label>
    <textarea class="text-area field__input" name="note" form="cart" id="Cart-note" placeholder="{{ 'sections.cart.note' | t }}">{{ cart.note }}</textarea>
  </cart-note>
  //EDIT_START
  <p class="cart-attribute__field">
    <input type="hidden" name="attributes[無料ラッピング希望]" form="cart" value="No">
    <input type="checkbox" id="giftRequest" name="attributes[無料ラッピング希望]" form="cart" value="Yes"{% if cart.attributes["無料ラッピング希望"] == "Yes" %} checked{% endif %}>
    <label for="giftRequest">無料ラッピング希望</label>
  </p>
  //EDIT_END
{%- endif -%}
When you open the cart page in your local environment, a checkbox that you want to wrap for free is displayed near the remarks column.
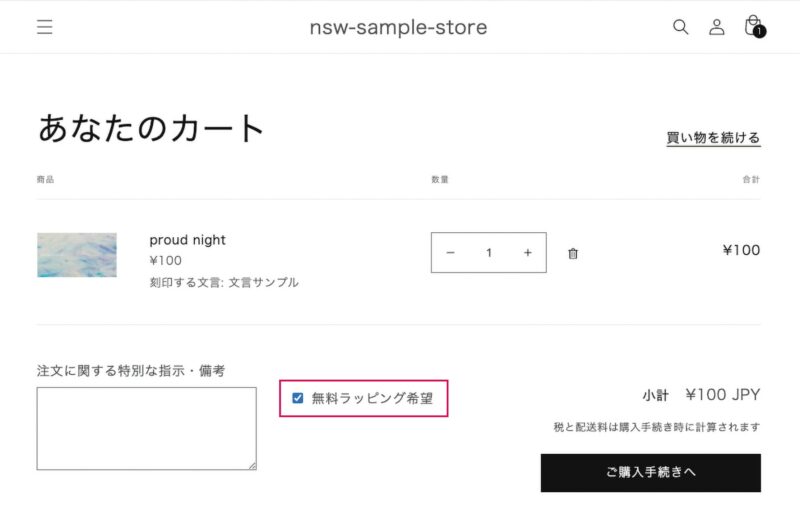
cart page with free wrapping checkbox
I’d like to say that this is done, but let’s make a test order and check if we are actually sending data to Shopify.
Since test orders are made from the development store rather than in a local environment, we will reflect this work into the theme of the store's theme library.
upload of a theme
Once you’ve finished working on a development theme, reflect your work into the theme in the Theme Library.
shopify theme push
check the display on the management screen with a test order
If you place a test order for the first time, some settings are required on your store.
Here we introduce Shopify’s Bogus Gateway as a payment service for making test orders, and note that you cannot accept real orders while you are enabling the Bogus Gateway.
Enable Bogus Gateway
Open the "Payment" page from "Settings" on the store management screen.
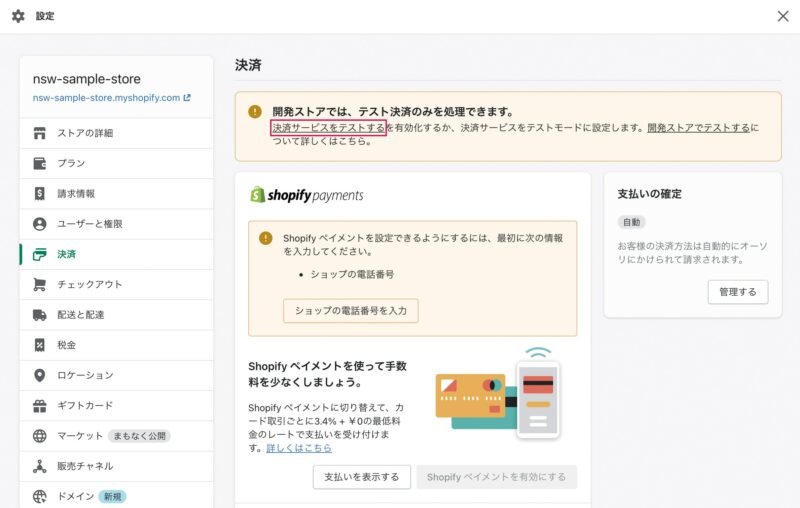
store payment settings page
At the top of the payment settings page, you will find a guide that says “You can only process test payments in your development store.
Click on the “Test Payment Service” link in the guide.
Go to the Bogus Gateway settings page.
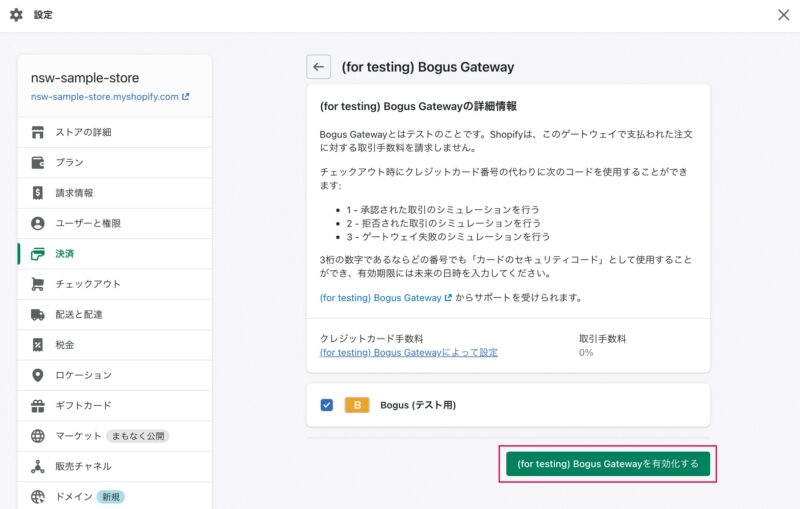 Bogus Gateway configuration page
Click the "Activate (for testing) Bogus Gateway" button.
This completes the setting to make a test order.
place a test order
Enter Line Item Property and Cart attribute respectively, then go to the cart page to check out the purchase process.
As shown below, Bogus Gateway is available on the payment screen.
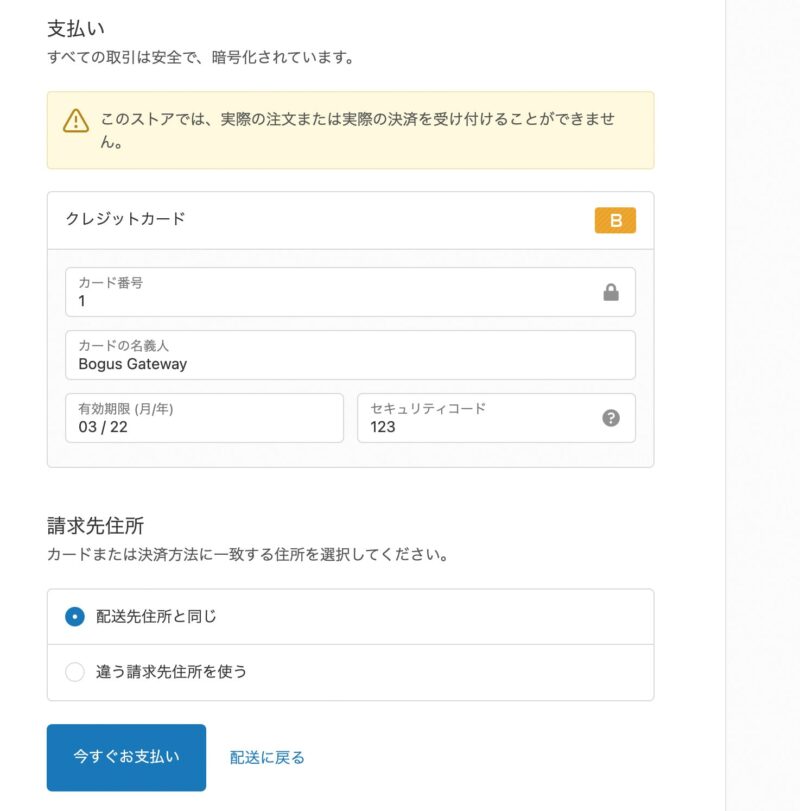
checkout screen with test order enabled
Specify the card number, name, expiration date and security code as follows to make a payment.
- card number: 1
- Bogus Gateway
- Expiration date: future date (in the form of month/year)
- Security Code: Any Three-digit Number
Transaction Simulation Type of Bogus Gateway
Depending on the card number, it is also possible to simulate transaction failures and errors.
For more information, please refer to the Shopify Help Center.
place a test order
https://help.shopify.com/ja/manual/checkout-settings/test-orders
check order data on the management screen
Once you have completed the test order, check the details of your order from “Order Management” on the management screen.
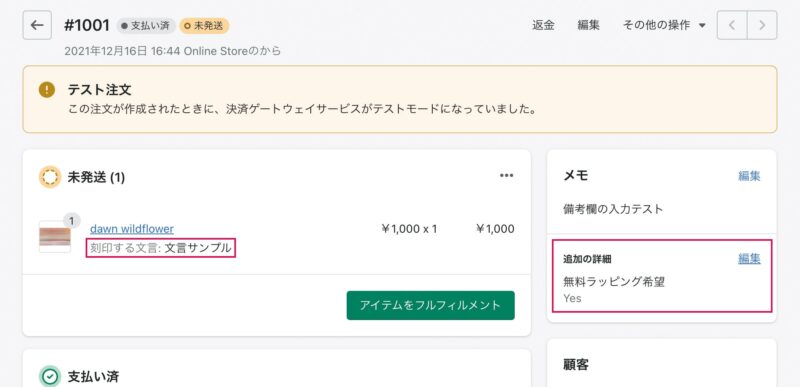
In the order detail, if you see "Insigned Word" content and "Free Wrapping Hope" information added this time, it is a success!
order detail screen
Line Item Property's engraved words are displayed in the information part of purchased goods, and Cart attribute's "Free Wrapping Hope" is displayed in the "Additional Details" section of order memo.
What is displayed as a memo is the input content of the remark column.
if we make it more sophisticated
As mentioned in the explanation, if you create your own block of input elements for Line Item Property and Cart attribute respectively, it will improve operability from the theme editor.
The steps to create a block are described in detail in the previous section “3-2.Create dynamic sections and blocks”, so please try it with reference to that.
Customize Shopify Dawn Themes - Create Dynamic Sections and Blocks
Customer note
Although this book has been omitted, in the user's account registration form there is also a "Customer note" as a mechanism to collect custom information like Line Item Property and Cart attribute.
Originally, the account registration form only has input items such as "hereditary name", "email address" and "password".With Customer note you can add an entry item like a user's birthday or allergy information to your account registration form for example.
Since the sample code is available in the official documentation, please refer to it when implementing.
Collect additional customer information
https://shopify.dev/themes/customer-engagement/additional-customer-information
display ~ in a notification e-mail
Another: Data obtained with Line Item Property and Cart attribute is available as a Liquid object.
Shopify sends you an order completion and other notification email consisting of Liquid, so adding Line Item Property and Cart attribute here will better support merchant-user communication. line_item.properties An example of an object's description is shown below.
// ※購入された商品の出力ループ内に記述すること
{% for line in subtotal_line_items %}
  {% unless line.properties == empty %}
    {% for property in line.properties %}
      <p>{{ property.first }}: {{ property.last }}</p>
    {% endfor %}
  {% endunless %}
{% endfor %}

// ▼レンダリング結果(Line Item Propertyのname名:入力データ)
// 刻印する文言: 文言サンプル
cart.attributes Examples of object description are as follows:
{% for attribute in attributes %}
  {% assign attributecheck = attribute | last %}
  {% if attributecheck != "" %}
   <p>{{ attribute | first }}:{{ attribute | last }}</p>
  {% endif %}
{% endfor %}

// ▼レンダリング結果(Cart attributeのname名:入力データ)
// 無料ラッピング希望:Yes
For more information about each object, see the official documentation.
The line_item object
https://shopify.dev/api/liquid/objects/line_item#line_item-properties
The cart object
https://shopify.dev/api/liquid/objects/cart#cart-attributes
Explanation on the Shopify Official Blog
An article on the official Shopify Japan blog will be presented as a teaching material to deepen your understanding of Cart attributes and Line Item Property (and customer notes that you have omitted).
It is very easy to understand, so please read it if you are interested.
Shopify Japan’s official blog is published in Japanese with updates and development tips from Shopify, which we recommend as a source of information.
Shopify Theme Customization: Use Cart attributes, Line Item Property and Customer note!
https://www.shopify.jp/blog/partner-shopify-theme-customize-cart-attributes-line-item-property-customer-note
Click here to purchase the introductory book on Shopify theme development that we produced at our company.
We do not have any plans for printing after the sale at this time, so if you would like to read a printed book please pick us up as soon as possible.
- Author: Sayaka Kawashima
- Publishing: Non-standard world, Inc.
- Number of pages: B5, 248
- Price: 3,850 yen (tax included) * Packed with PDF version, free shipping