How to set up Acuity Scheduling for in-store appointments and online consultations

Hello, I am art director Sato.
The COVID-19 pandemic has made it difficult for people with physical stores to operate normally, so a web service that allows customers to book and manage their stores fully by booking or by introducing online customer service. Acuity Scheduling (Accuracy Scheduling)
I hope this article will be of any help to those in need.
Contents [ hidden display ]
assumed use case
- Reservations for online customer service/online classes using video calls
- time-limited store reservations to avoid a dense crowd
Overview of Acuity Scheduling
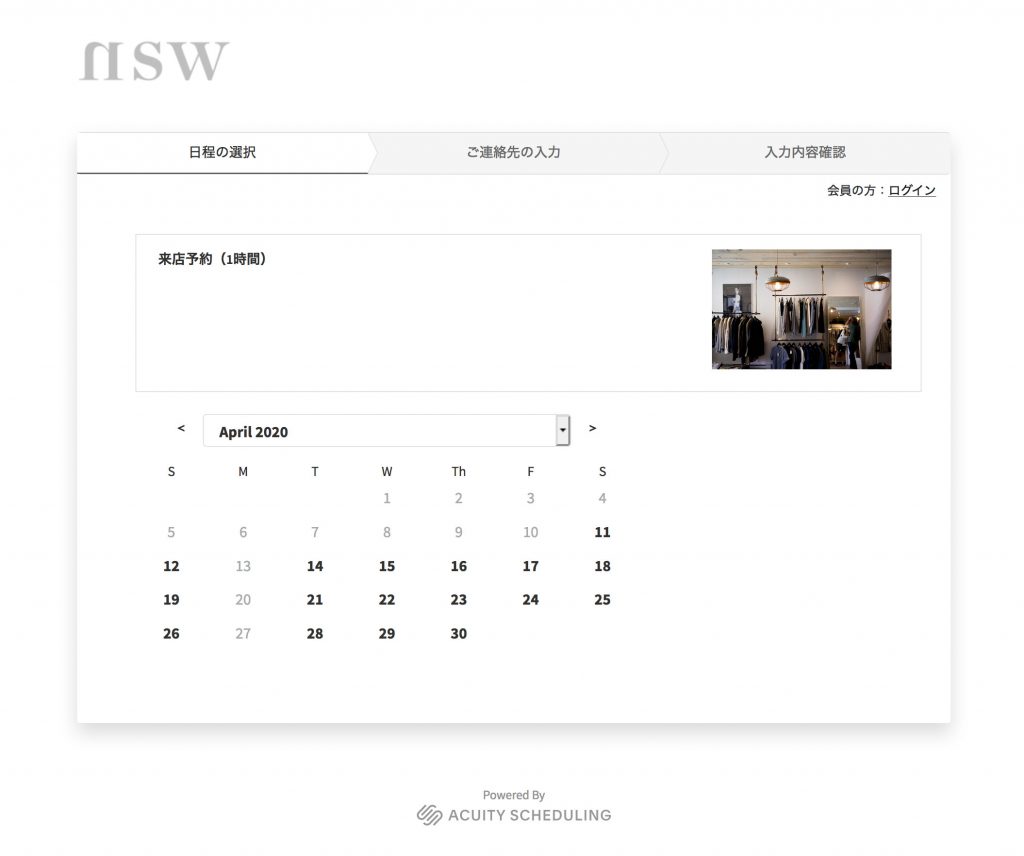
You can create a reservation page like the above without any expertise, it is a system that allows you to accept and manage reservations by synchronizing with your calendar.
Squarespace is a SaaS company in New York.
Features
- Sync With Google Calendar And iCloud Calendar To Show You When You Can Book
- When you make a reservation, your calendar will automatically be added to it.
- It doesn't take much time for you to cancel or change online.
- You can install credit card payments, so you can use them for online lessons.
- we can create a questionnaire form.
- have a clean design
- The base is in English, but the part that can be seen by customers can almost become Japanese.
- week-long free trial
Introducing Acuity Scheduling
Here’s how to set up Acuity Scheduling:For English, I will explain it a little more carefully.
account creation
Press the "TRY IT NOW" button on the above page and enter as follows.
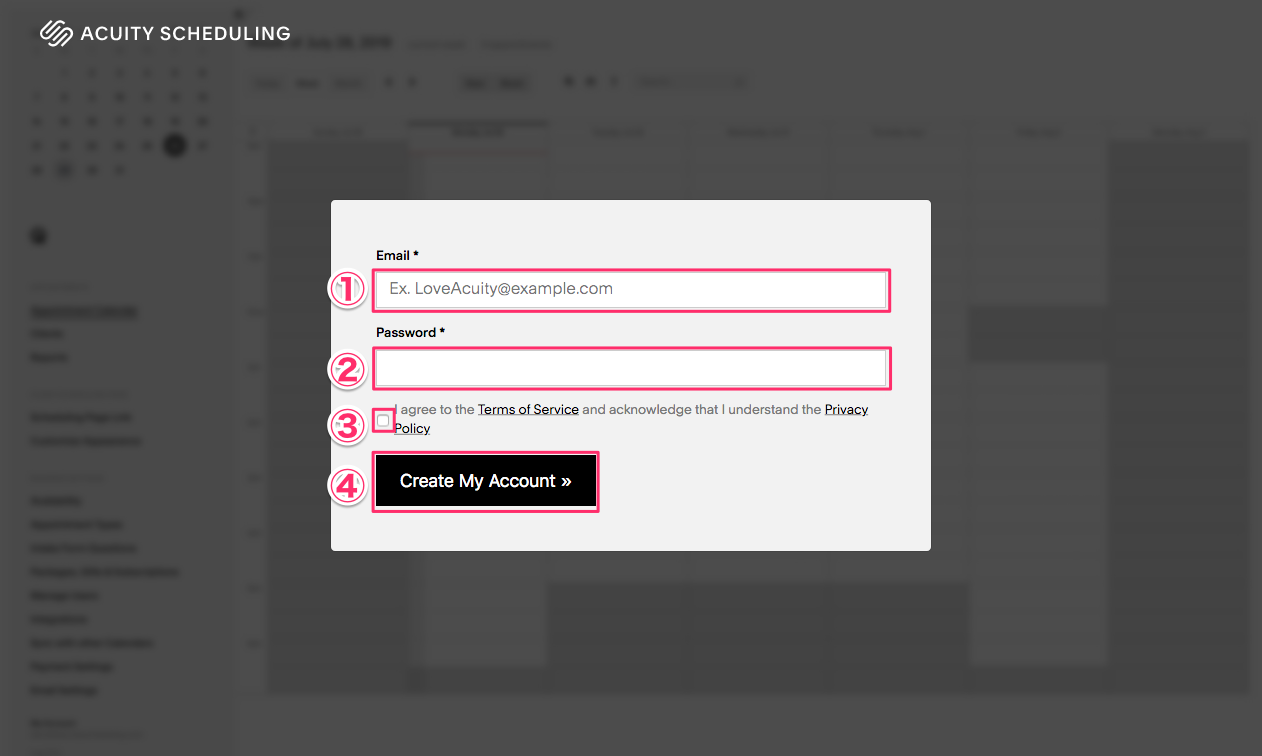
1 Enter your email address.
two passwords.
check one's consent to three terms
4 Press Create My Account
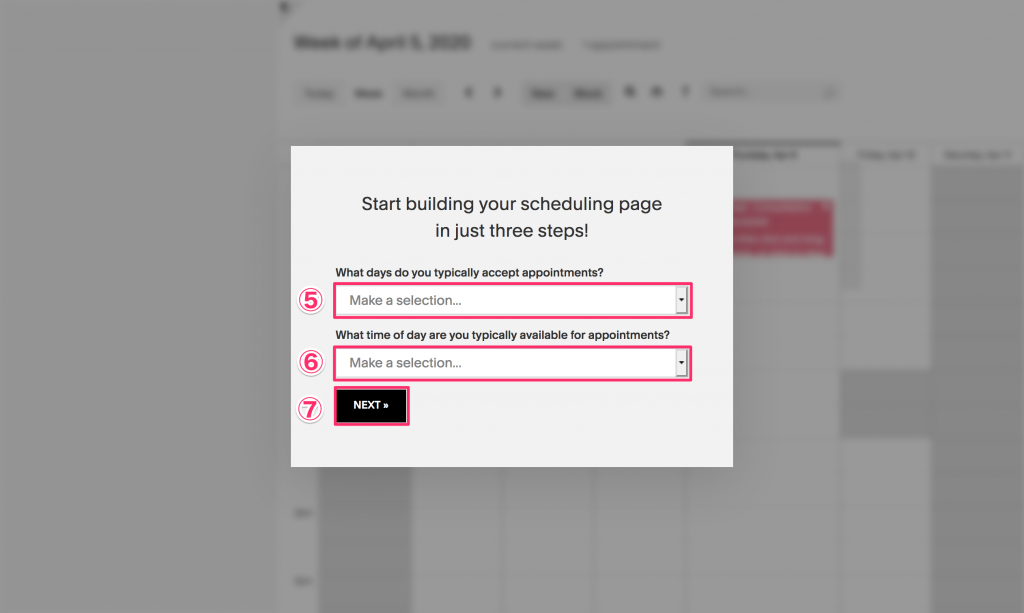
five business days.
six business hours.
7 Press Next.
* It can be set in detail later.
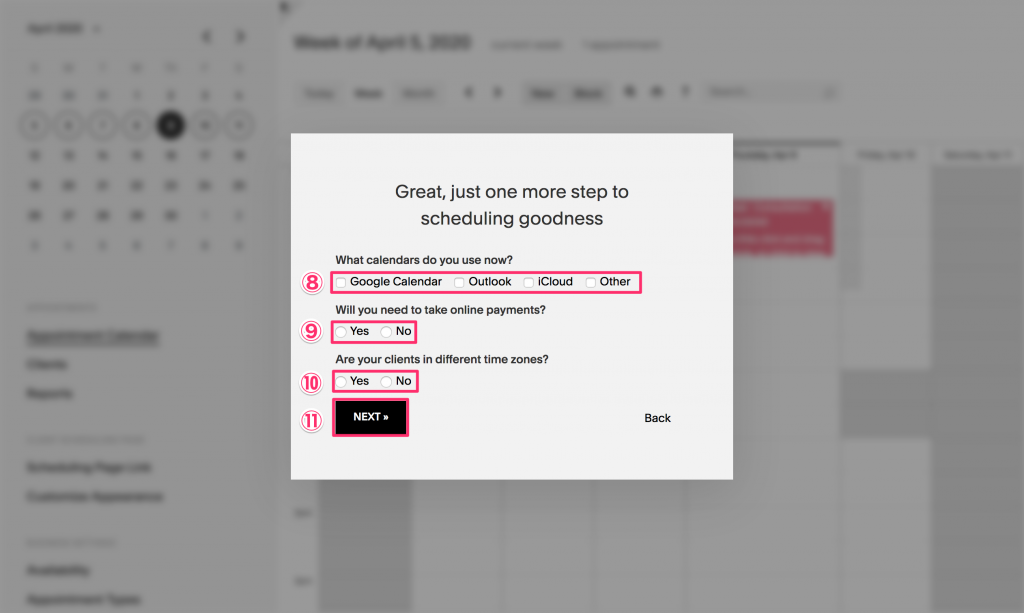
8 Select the calendar you want to sync
9 Selecting the presence or absence of online payments
Choose whether or not there is a 10 o'clock difference (Select No if you are a domestic target)
11 Press Next
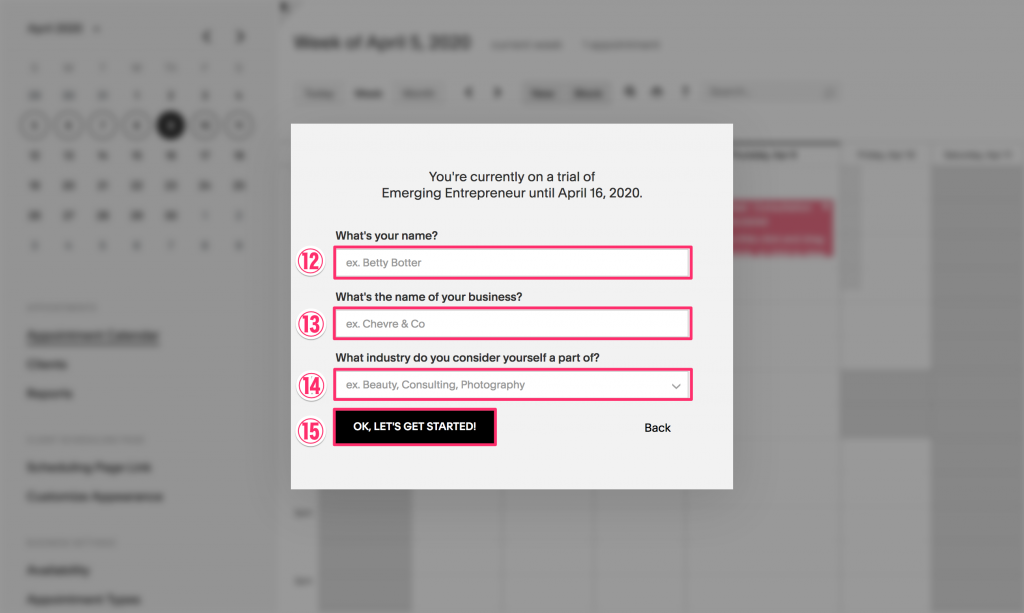
enter 12 names.
enter a name of 13 stores or companies
choose 14 industries
15, press okay.
setting of business hours
We will set up business hours in the following steps.
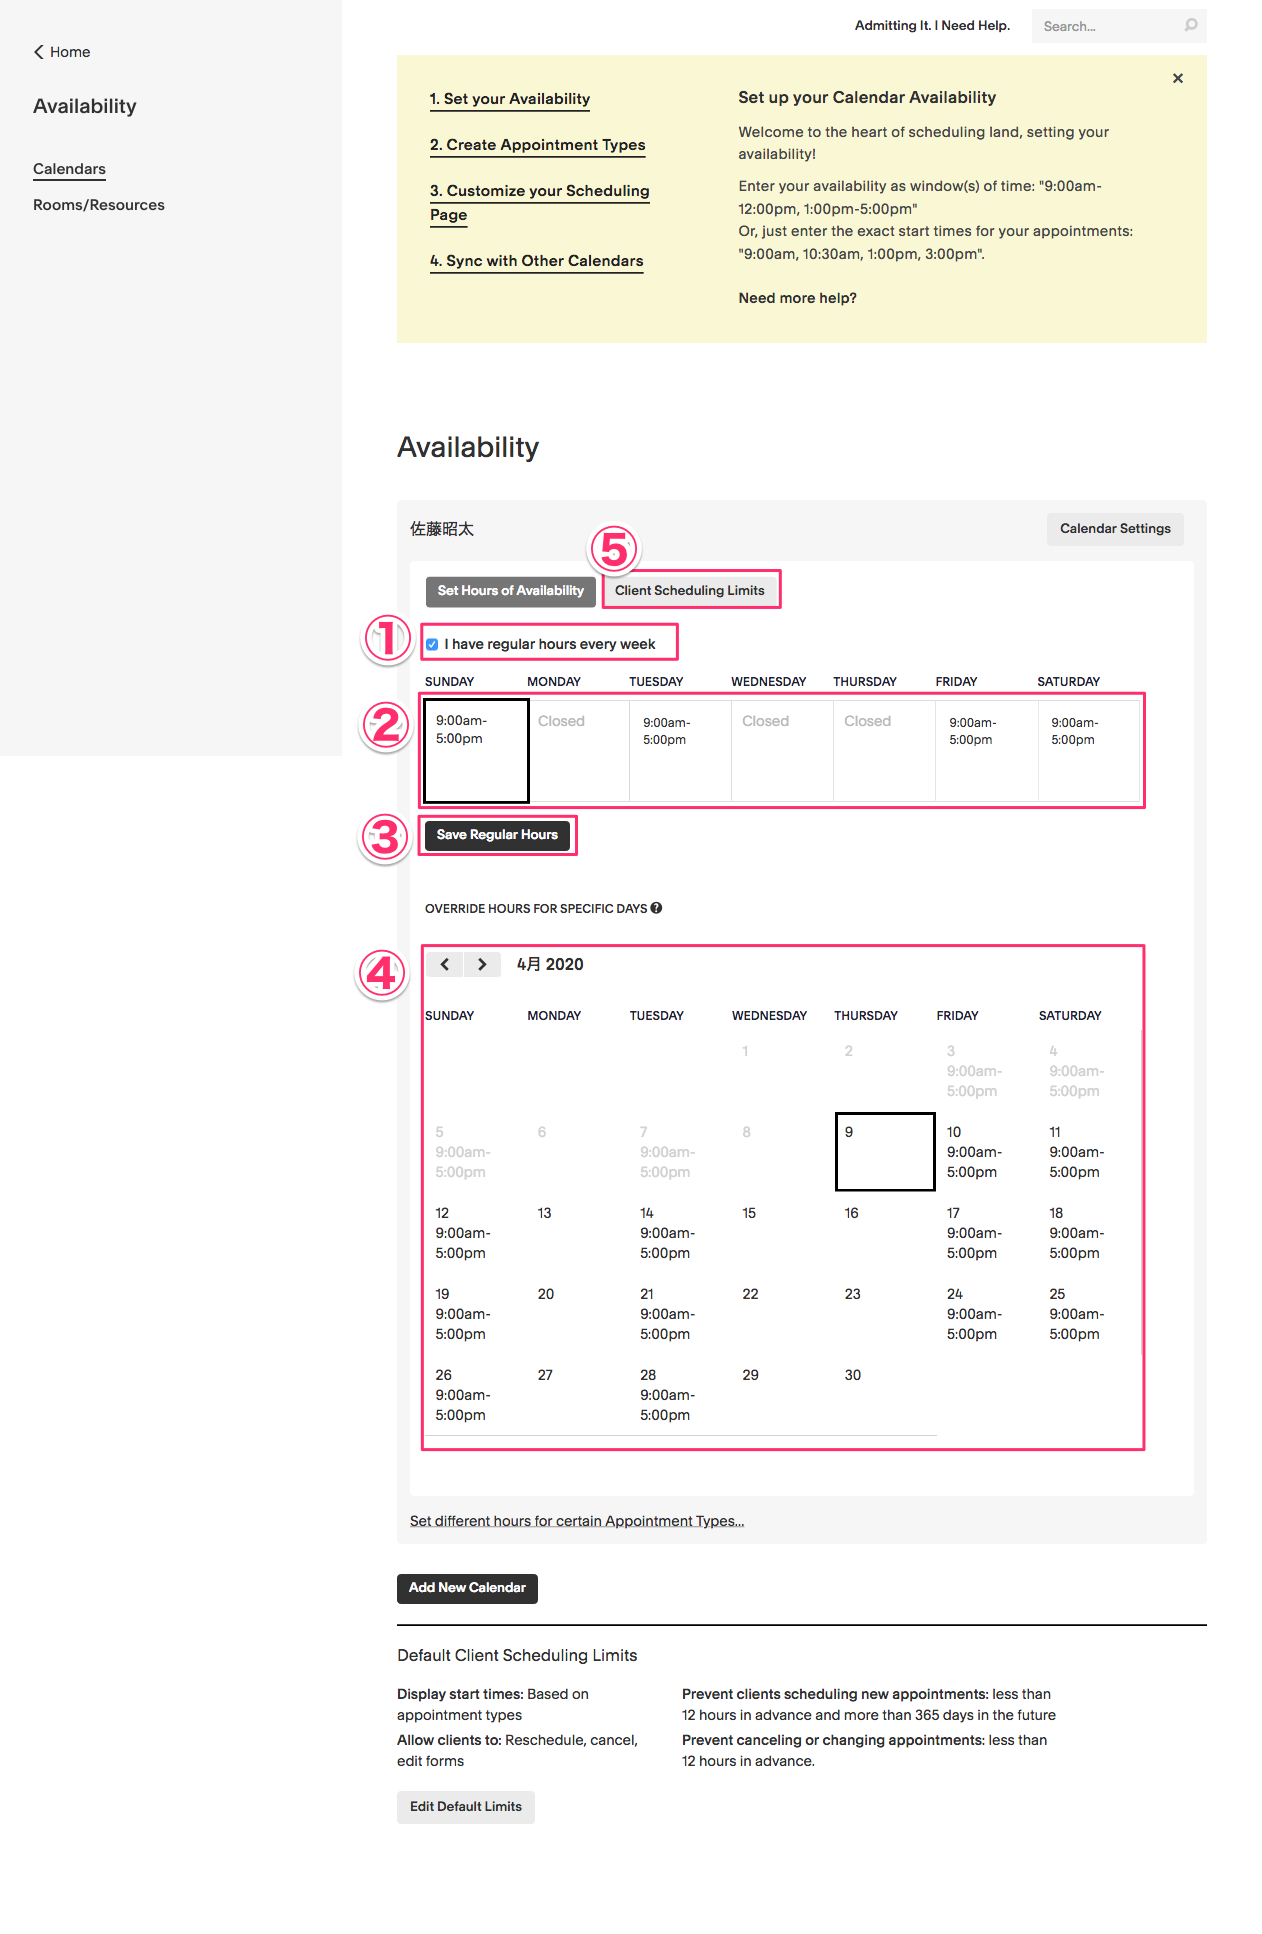
1) Check if there is a fixed business day or business hours.
2 Input the business hours of each day in text, and delete the text on regular holidays.
If you are holding a workshop on an irregular basis, remove all text in 2, and fly to 9 when it is completed until 5.
save three settings.
4) If there is an irregular business day or business hours, input
press five to switch to the reservation limit screen
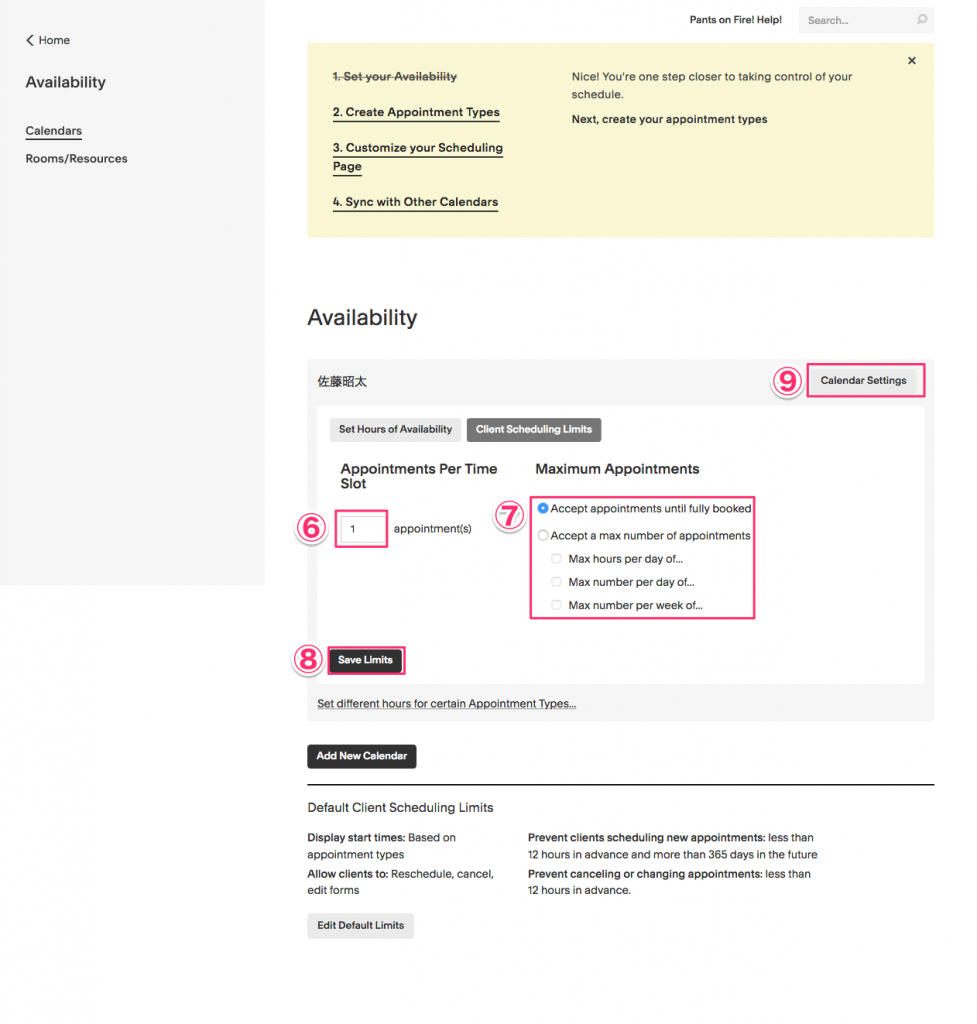
6. Enter the number of reservations accepted per booking slot.
7 Select “Accept appointments until fully booked” if you accept the number of reservations without limit, and “Accept a max number of appointments” when you set the number of reservations; in the latter case, select Max times per day ..., Max numbers per day..., and Max numbers per week.
8 Press Save Limits
9 Press Calendar Settings
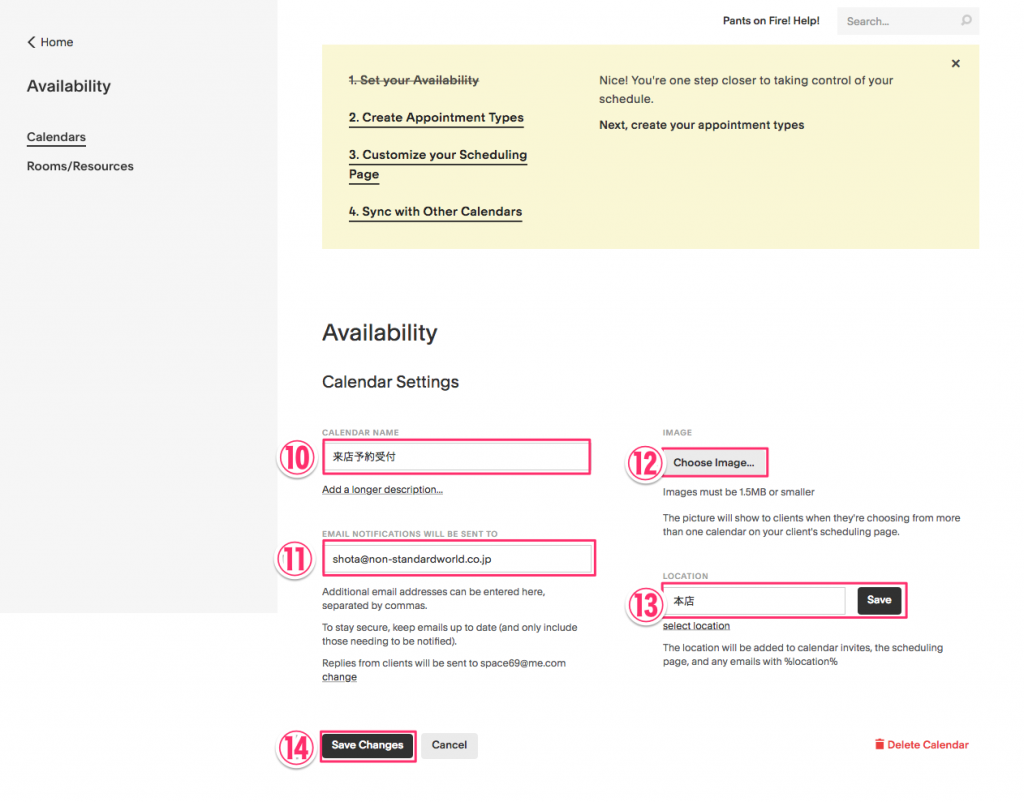
10 Enter the name of your booking calendar.
11 Enter an e-mail address that sends notice of reservation reception
12-image image selection (up to 1.5MB)
Enter the name of 13 places and press Save.
14. Press Save Changes

15 Press Add New Calendar
creation of a service to accept reservations
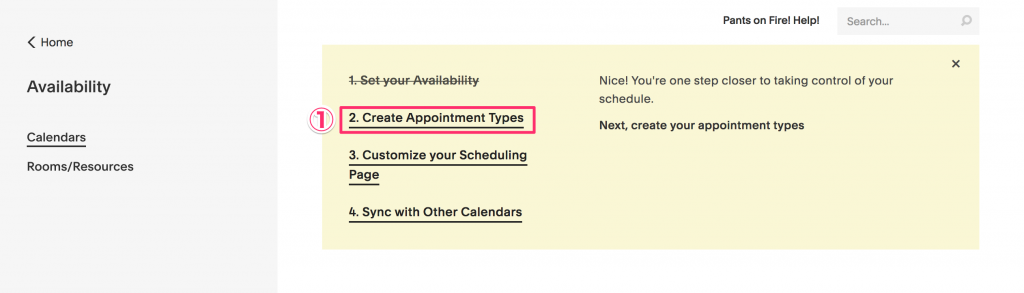
1 Press Create Appointment Types
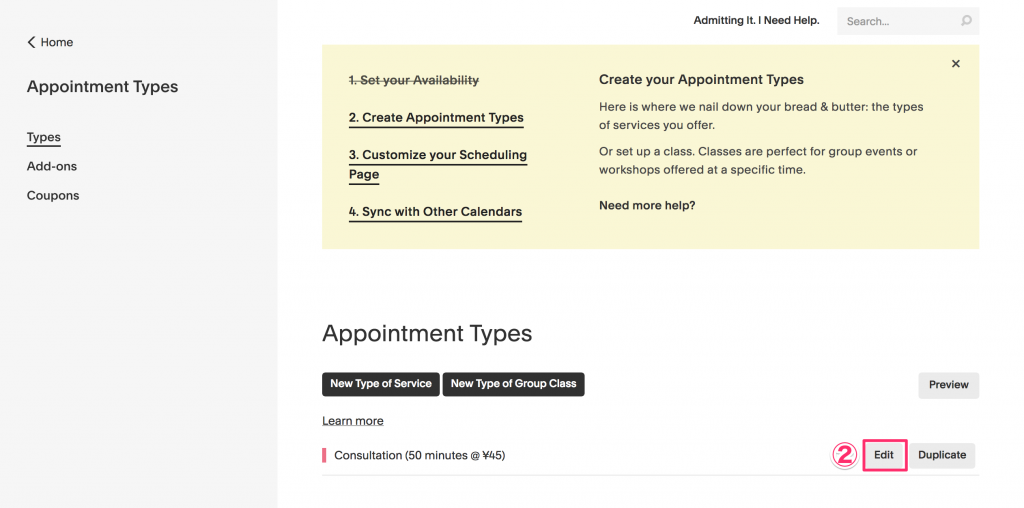
we've got two samples, so i press edit.
workshopPress "New Type of Group Class" (you can create a form that multiple people can book)
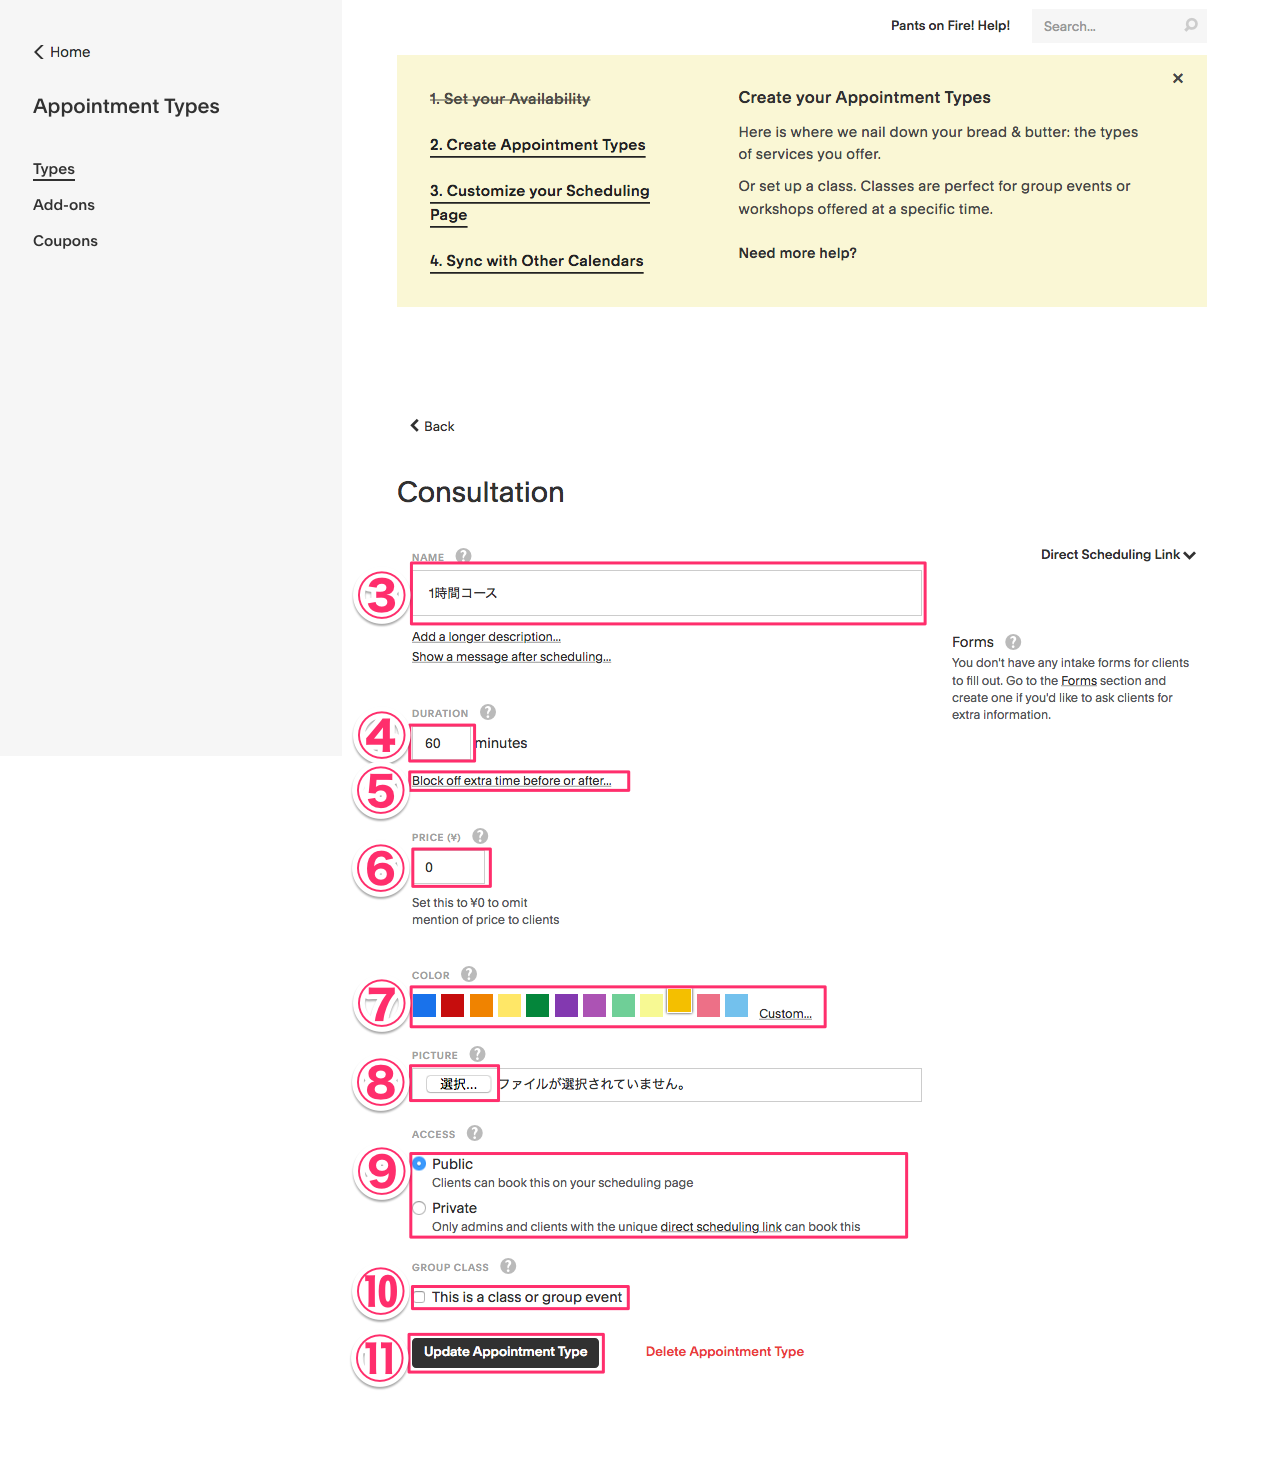
three service names.
enter four times.
5 If you want to secure a preliminary time before or after a reservation, press and enter.
enter six dollars.
set seven colors.
select 8 images
9Select to make your booking page public (Public) or private only for those who know the link
If you have a class with 10 or more people, check in and enter the maximum number of people.
11 Press Update
workshopCheck 10, enter the maximum number of people and press Create.
12 Select a Calendar to Post an Offer Class 12 Workshop Enter the 13 Workshop Dates and Time 14 Press Save Class
Customize your booking page
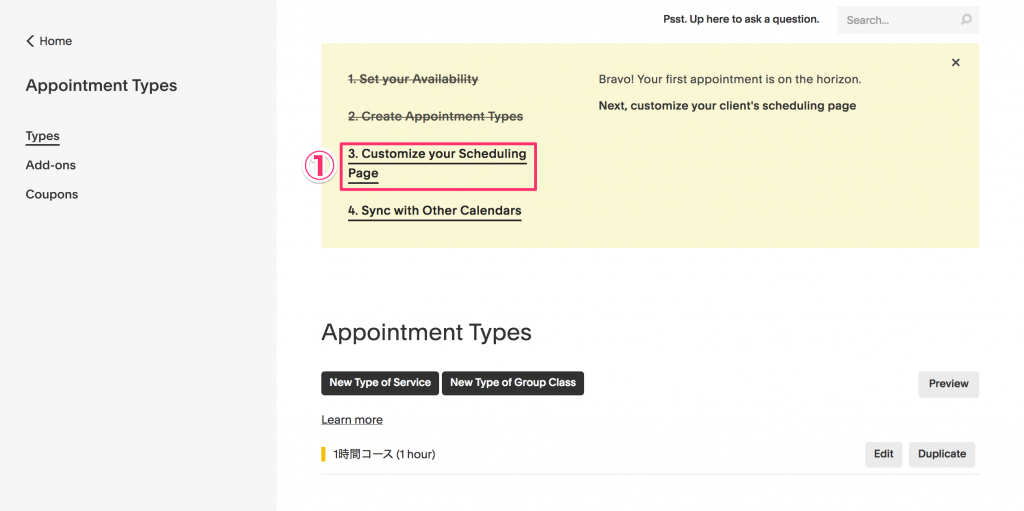
1 Press Customize your Scheduling Page
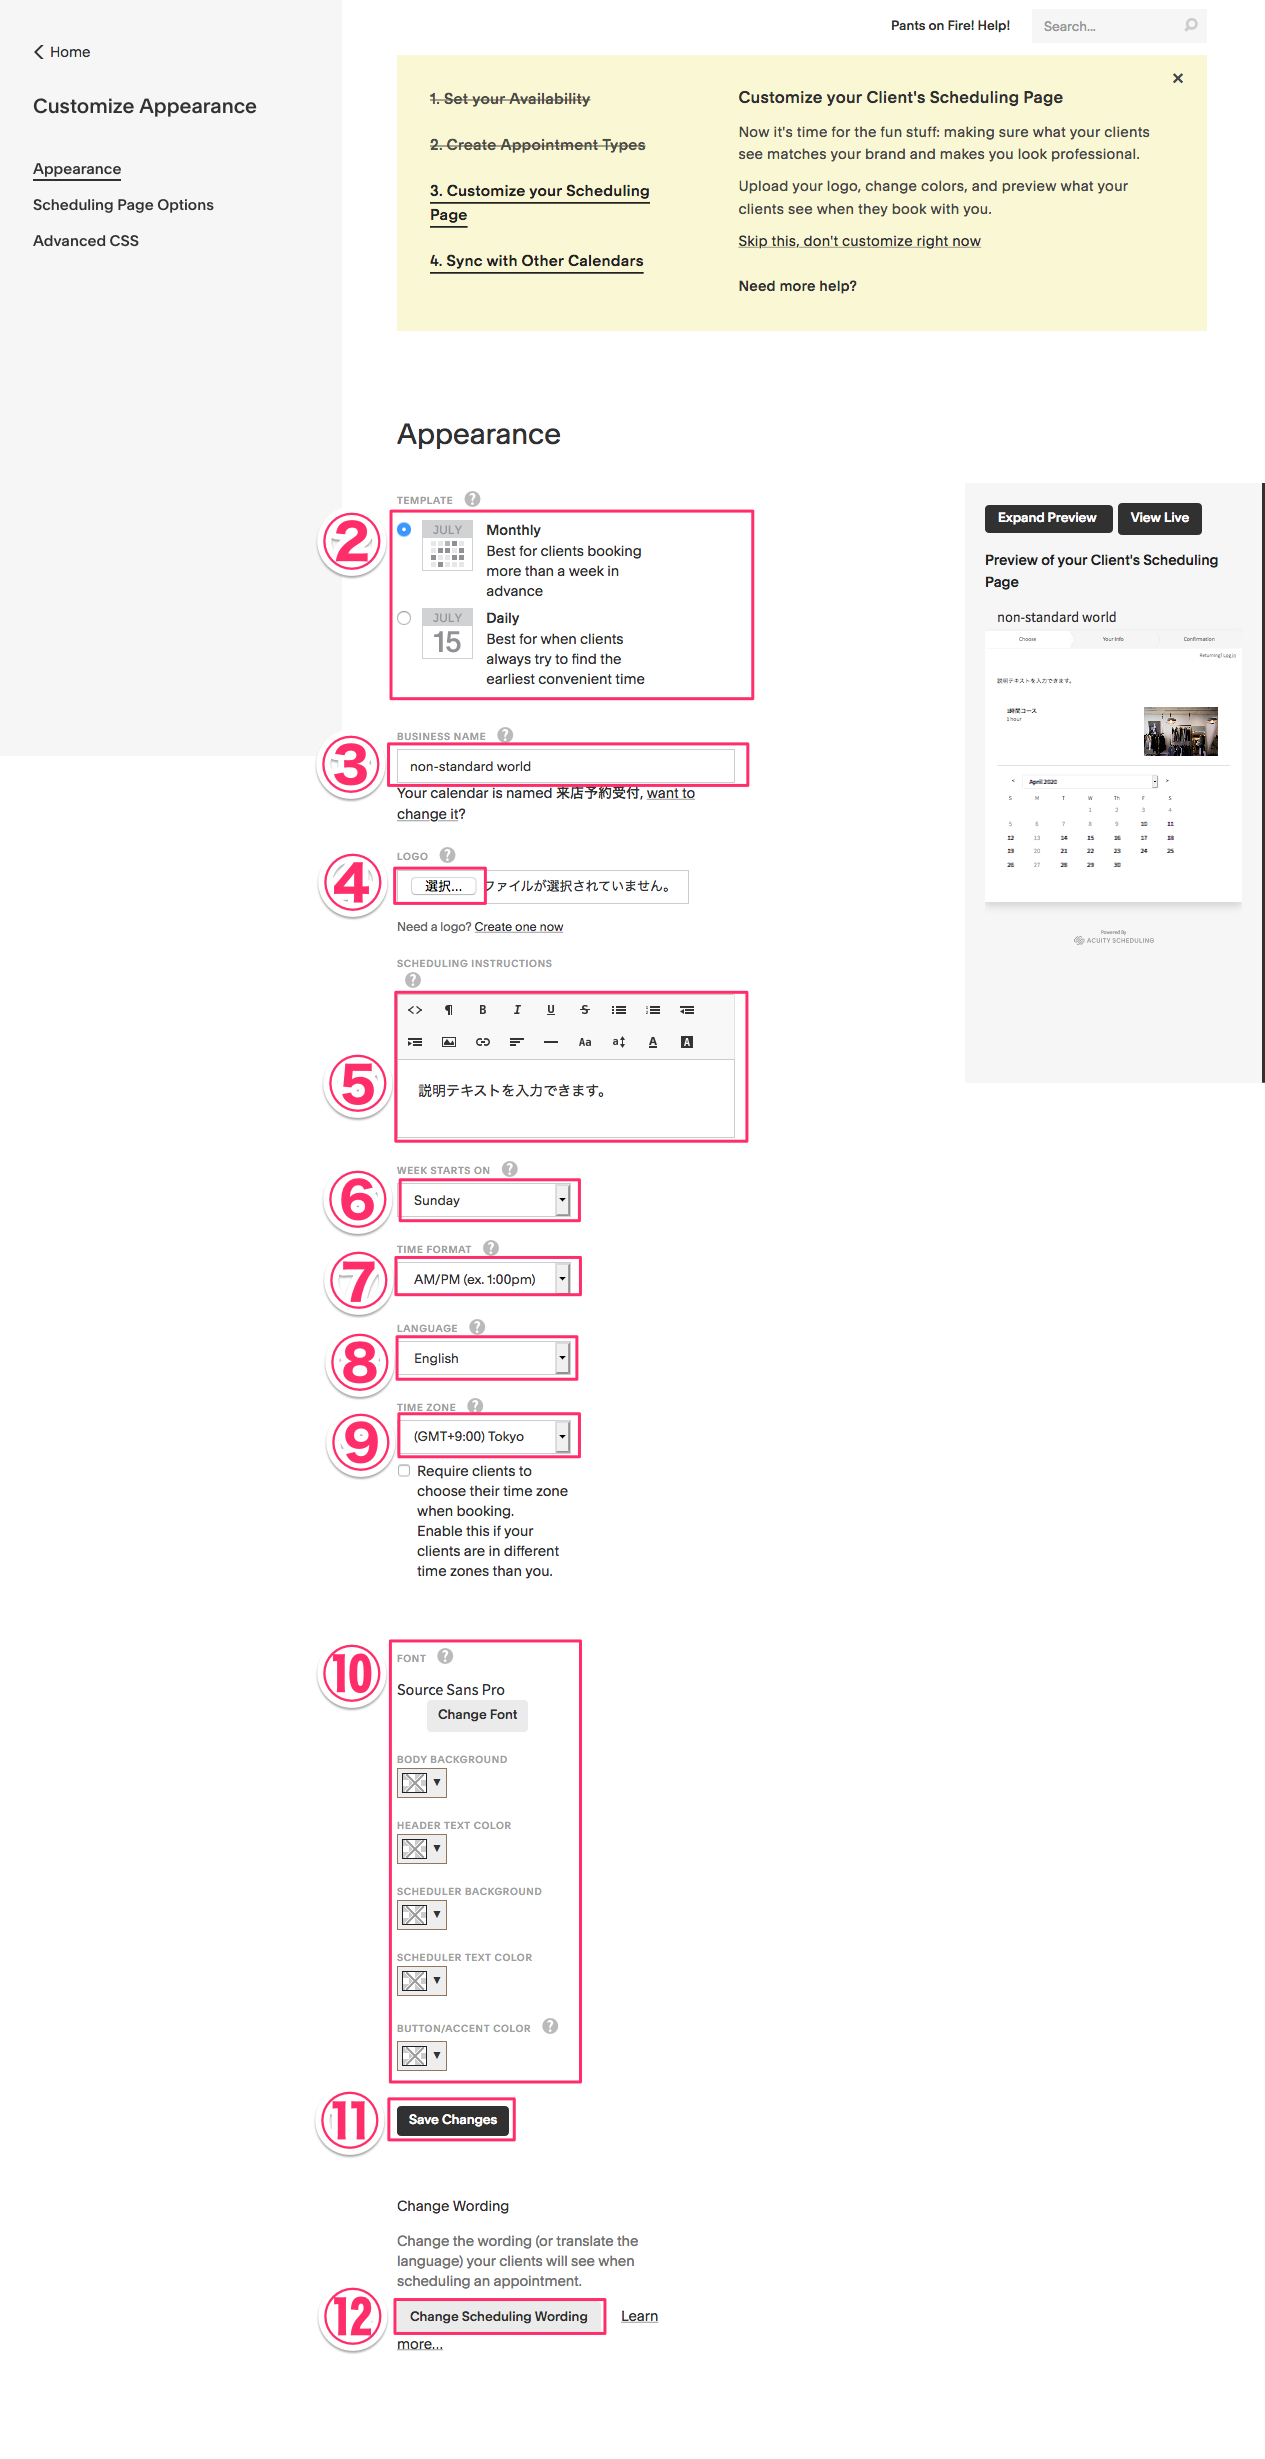
2Choose Monthly or Weekly Displays for Calendar
enter three stores or company names
4 If you have a logo, choose.
5 Input the description text (optional)
Six Calendars Start Sunday, Choose Monday
712 hours, 24 hours.
Select 8 languages (select English once and translate to Japanese in later steps)
nine time zones.
10 fonts, background colors and more (optional)
11: Press Save Changes
12 Press Change Schedule Wording
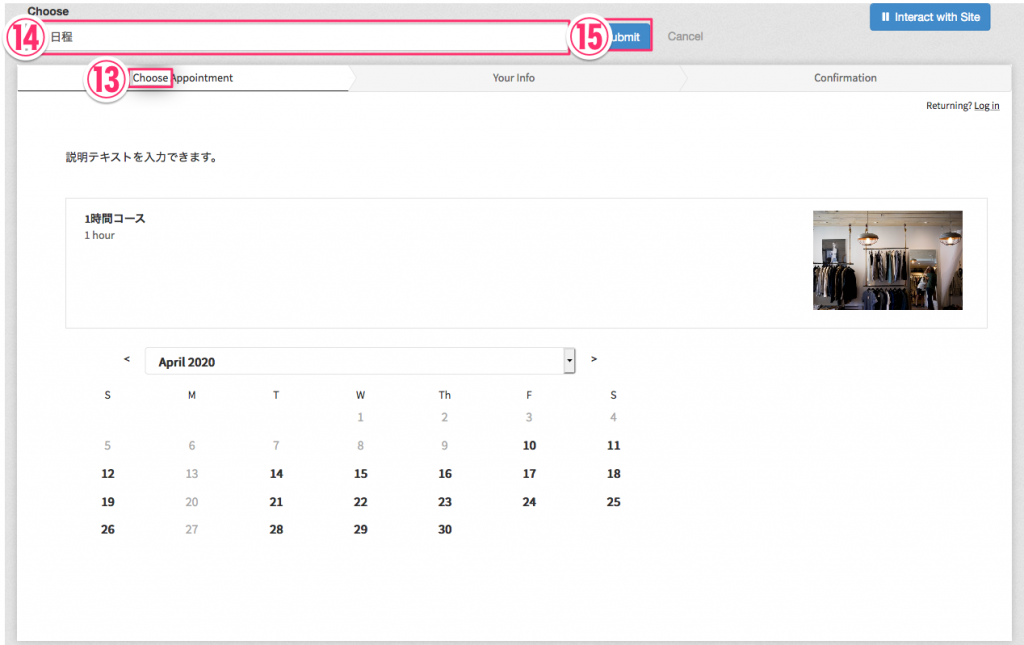
13 Press the text to be changed
14 translations.
15 Press Submit
* Repeat 13-15 and close the window once it's done
Japanese translation
Choose Appointment
--Your Info → Enter where to contact
Confirmation → Complete
Returning? → Members:
Log in → Login
Continue → Next
Add a Time → add date and time
Recurring → Reservation
Name -> your name
First Name → Kabane (originally a name, but changed according to the order of words in Japanese)
Last Name
Phone → Telephone number
Email → E-mail address
To finalize your reservation
Change → Back to Schedule Selection
Cancel → Cancellation of reservation
Reschedule → Reservation changes
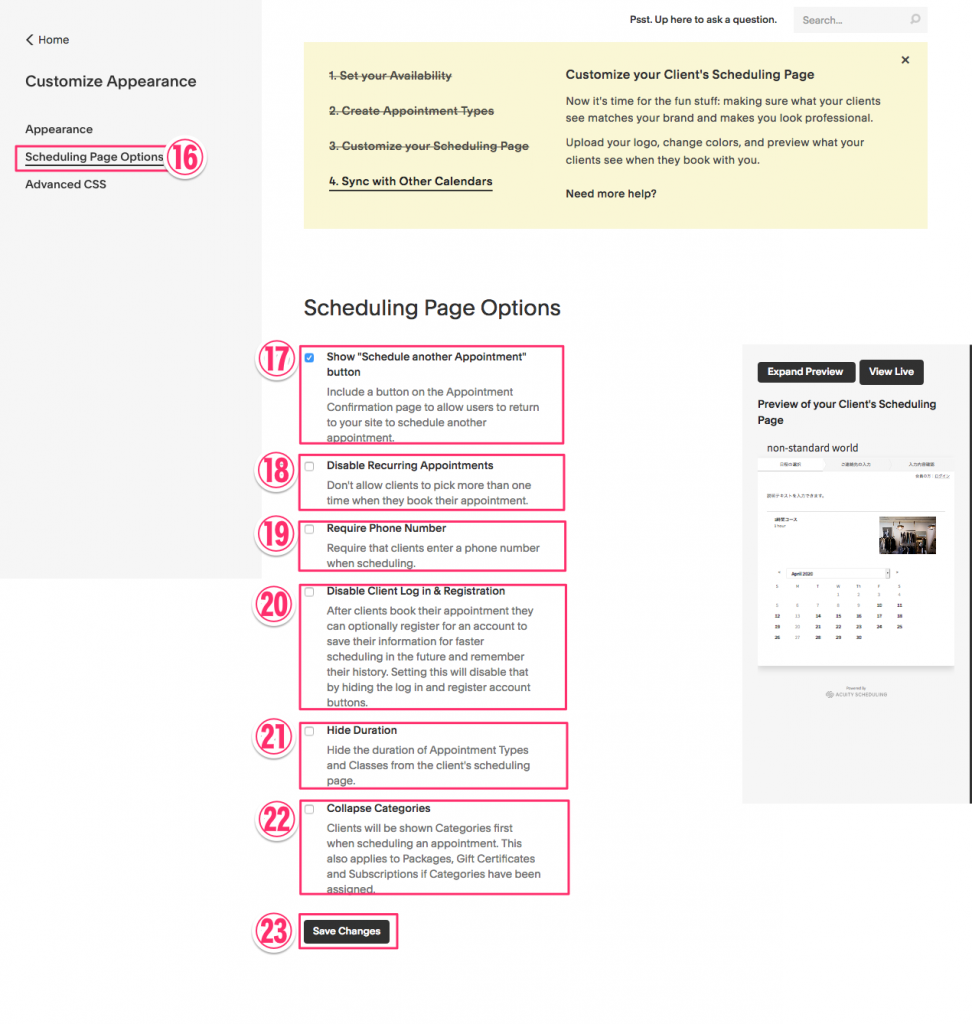
16 Press "Scheduling Page Options"
17If you want to display the "Do Other Reservations" button on your completion page, check it out.
18If you don't see a repeat booking option, check it out.
19 If you require a phone number, check it out.
20If you want to disable registration and login function, check it out.
21If the reservation type does not display a period when "Class" is used, check it.
If you are using 22 categories and want to display the items under that category in an accordion expansion, check them out.
23 Press Save Changes
calendar synchronization
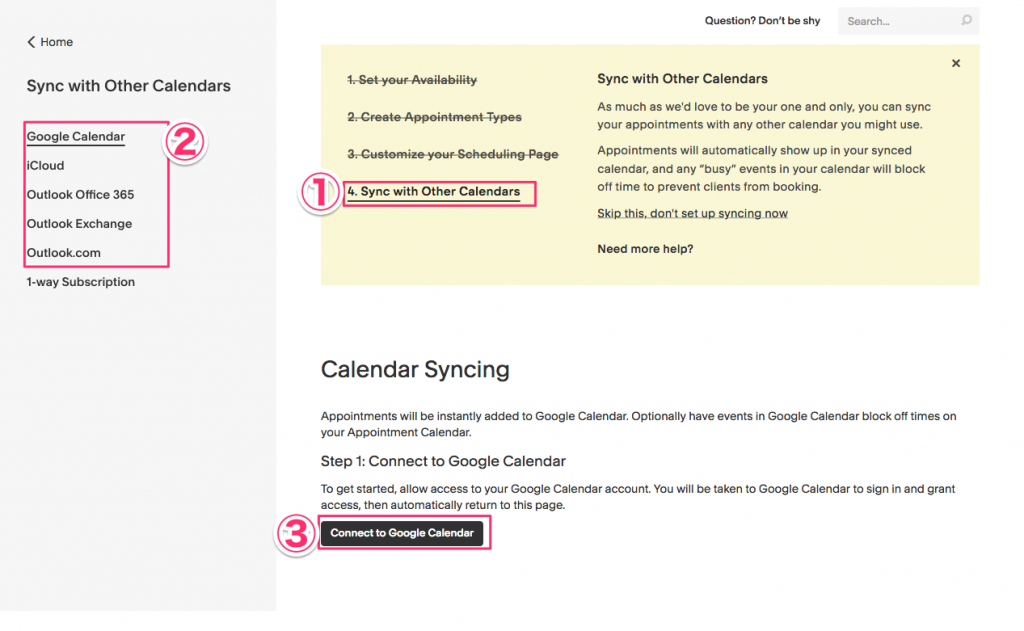
1 Press "Sync with Other Calendars"
2 Select the type of calendar
3 Press Connect and log in to an external service for connection.
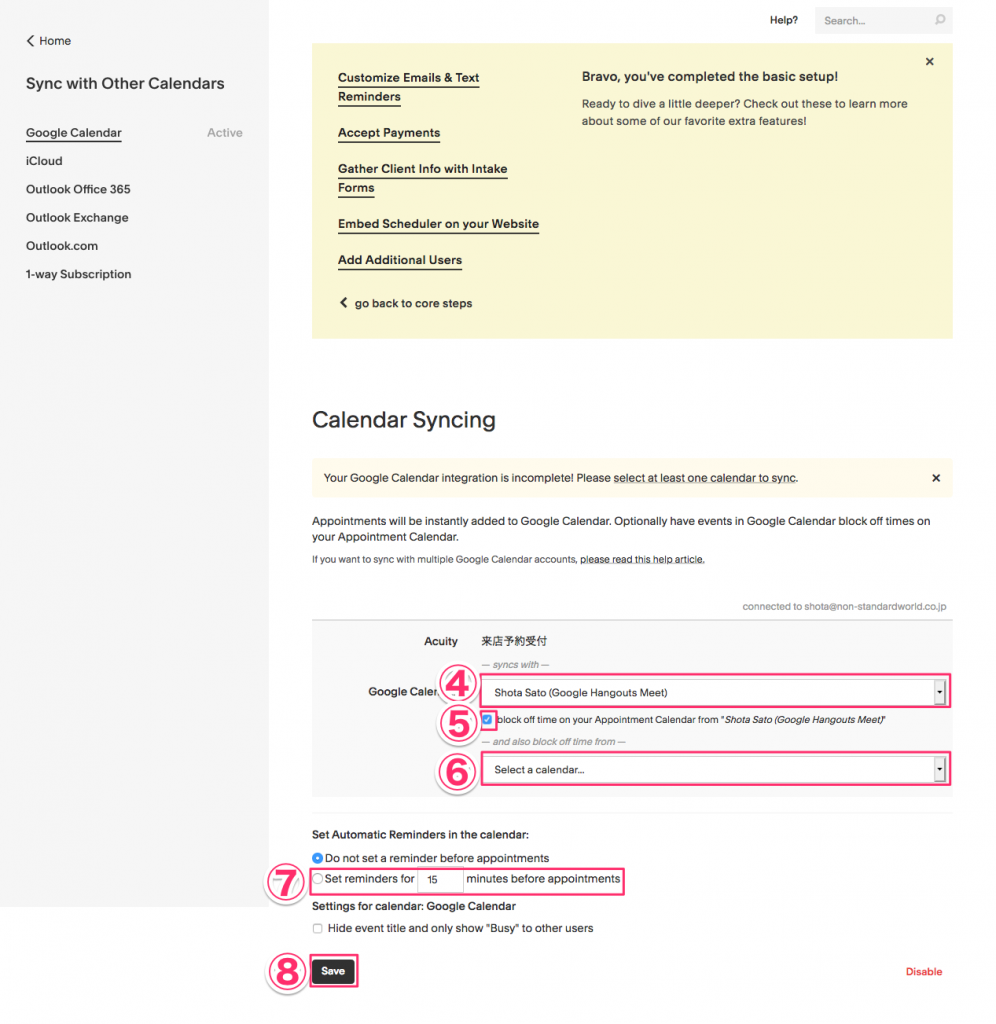
4 Select a calendar to sync
5) Check when blocking the scheduled time zone of a calendar that is in sync so it can not be booked
6 If you want to block a calendar schedule from another calendar, add it and select your calendar.
7When reminding a calendar, set it up.
eight, press save.
Customization of Automatic Replies
It works as it is, but I recommend Japanese version because it is English.
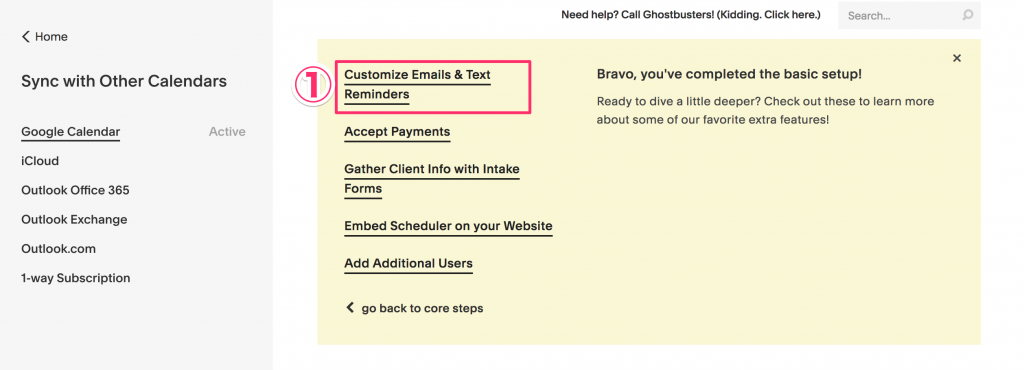
1 Press Customize Emails
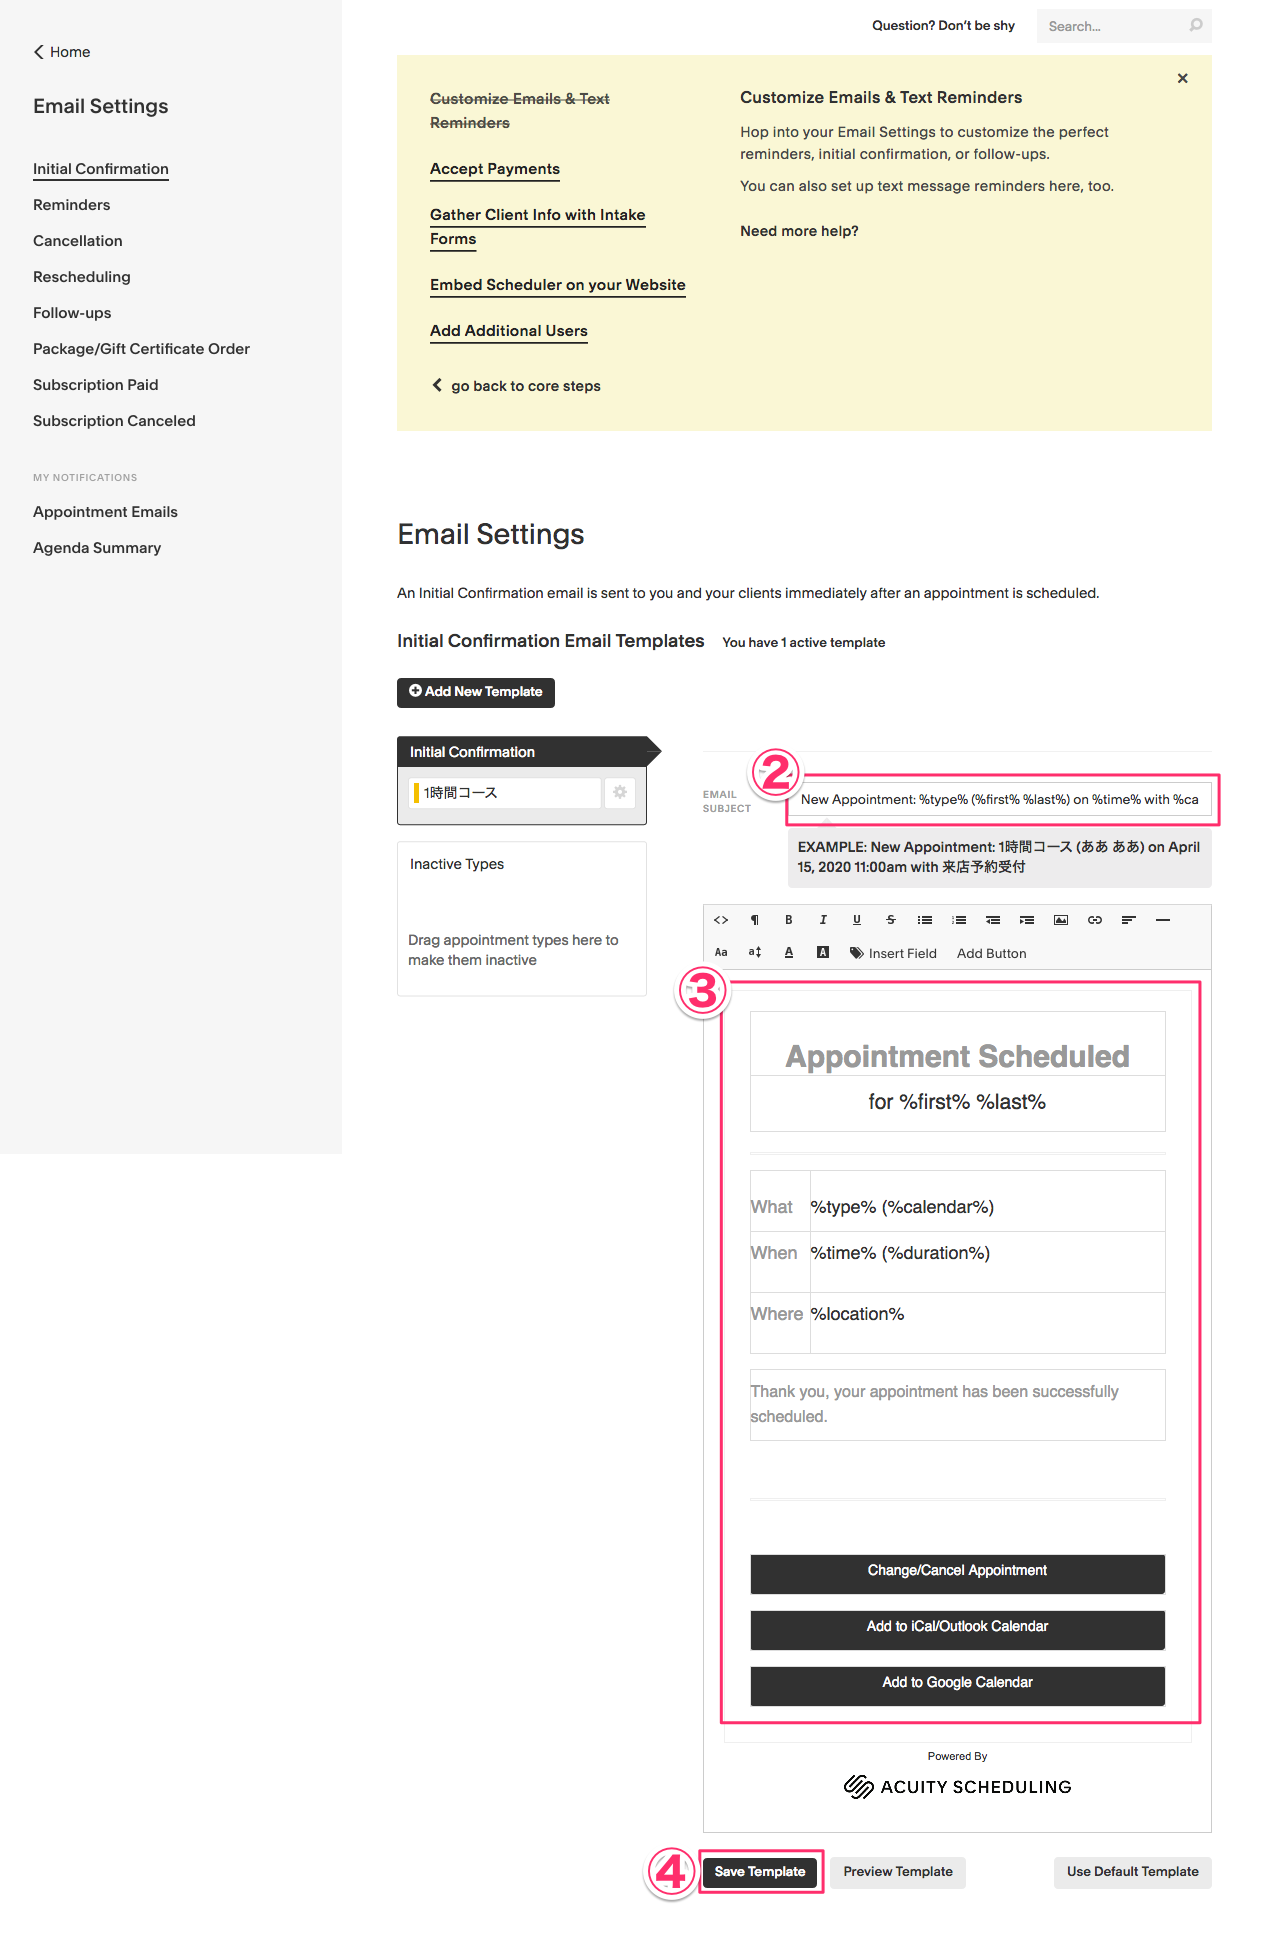
2 Edit mail subject
3 Editing the text.
4 Press Save Template
Japanese translation
New Appointment: %type% (%first %last%) on %time% with %calendar%
Thank you for your reservation at %type%
-- Appointment Scheduled → Thank you for your reservation.
• for %first% %last% → %first% %last%
What → Contents
Date and time
Where → Place
Thank you, your appointment has been successfully scheduled.
→ Reservations were accepted with the above contents.
Change/Cancel Appointment → Cancel/Change Reservations
Add to iCal/Outlook Calendar → Register for an iCal/Outlook calendar
Add to Google Calendar → Register your calendar
Retrieving the URL of a reservation page
The URL of the reservation reception page created will be obtained by the following method.
You can start accepting reservations by showing this URL.
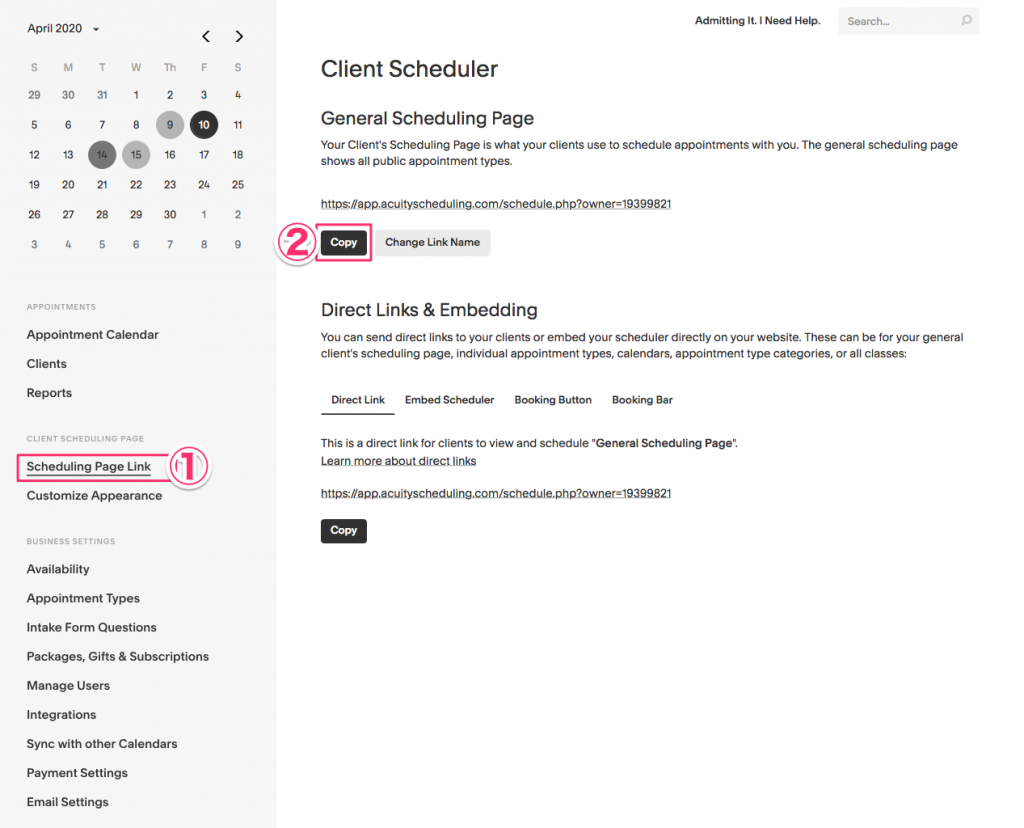
1Click on "Scheduling Page Link" on Home screen
2 Press Copy to copy the URL.
Other settings (optional)
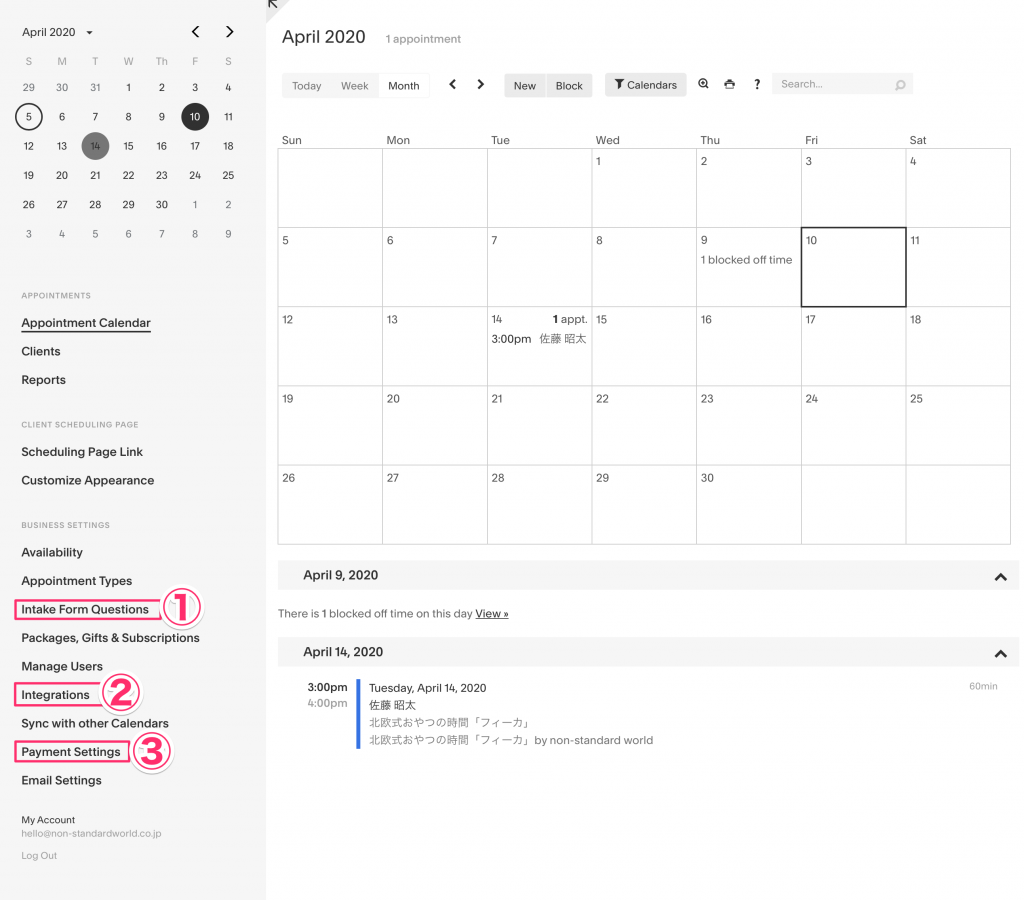
1) When preparing a questionnaire at the time of reservation, set from here.
2If you want to automatically issue a video call URL at the time of booking in conjunction with Video Call "zoom", set from here.
3) When preparing online payment, set from here.
on the go
Since the setting screen is English, there are some difficult impressions, but if you set it in order, you can start a reservation reception without needing web expertise.
There is also a free trial period, so please try it.